Integrations
VS Code
Configure VS Code to use Qubrid AI models through a custom Chat Completions endpoint
Connect VS Code to Qubrid AI by adding Qubrid as a custom language model provider. After setup, your Qubrid models appear under Other Models in the model picker, and you can use them in VS Code Chat for coding assistance with your Qubrid endpoint and API key.
Prerequisites:
- Visual Studio Code installed on your machine
- A Qubrid account on the Qubrid AI Platform
- A Qubrid API key (how to generate an API key)
Configure Qubrid AI in VS Code
Install VS Code
If you do not already have VS Code, download and install it from code.visualstudio.com.
Open Manage Language Models
Open the Command Palette with Ctrl+Shift+P on Windows/Linux or Cmd+Shift+P on macOS.
In the search bar, type:
>manage language modelsSelect Chat: Manage Language Models from the dropdown and press Enter (or click it).
This opens the Language Models dialog.
Add a custom endpoint
In the Language Models dialog, click + Add Models.
From the list that opens, select Custom Endpoint.
Set a group name
Enter a group name for your provider. The default is Custom Endpoint; you can use Qubrid AI or any label you prefer.
Press Enter to continue.
Paste your Qubrid API key
When prompted for an API key:
- Open the Qubrid AI Platform and generate an API key. Follow How to generate an API Key.
- Copy the key and paste it into the API key field in VS Code.
Your API key is shown only once for security. Store it somewhere safe and secure before closing the dialog. If you lose it, you must generate a new key.
Select Chat Completions API
When asked for the API Type, select Chat Completions API.
Configure the model in JSON
VS Code opens a chatLanguageModels.json file. The name, vendor, apiKey, and apiType fields are prepopulated.
Add your model id, name, and url under models. Use the Qubrid API base URL and copy model IDs from the Serverless Models catalog.
Example configuration:
[
  {
    "name": "Qubrid AI",
    "vendor": "customendpoint",
    "apiKey": "${input:chat.lm.secret.-627ebf0e}",
    "apiType": "chat-completions",
    "models": [
      {
        "id": "MiniMaxAI/MiniMax-M3",
        "name": "MiniMaxAI/MiniMax-M3",
        "url": "https://platform.qubrid.com/v1",
        "toolCalling": true,
        "vision": true,
        "maxInputTokens": 128000,
        "maxOutputTokens": 16000
      }
    ]
  }
]
Do not change the vendor field. It must stay as customendpoint or your model will not appear in the picker.
Replace the model id and name with the values from Serverless Models. The url should be the Qubrid API base URL:
https://platform.qubrid.com/v1You can add multiple models under the models array by copying the model object and updating id and name for each one.
Adjust toolCalling, vision, maxInputTokens, and maxOutputTokens to match the capabilities of the model you choose.
Save and select your model
Save the JSON file.
Your Qubrid model should now appear under Other Models in the VS Code model picker, grouped under the name you chose (for example Qubrid AI).
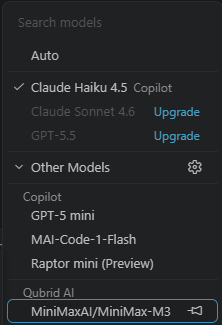
Open the model picker in Chat, expand Other Models, and select your Qubrid model. Send a test prompt to confirm responses are coming from Qubrid.
Your Qubrid integration with VS Code is now configured.
Monitor usage on Qubrid
Keep an eye on your usage and costs on the Qubrid platform.
- Review Inference Logs to see request history and debug issues.
- Check your credit balance before long or high-volume coding sessions.
- Rotate API keys if you suspect a key was exposed.
Configuration reference
| Setting | Value |
|---|---|
| Group name | Qubrid AI (or your chosen label) |
| Provider type | Custom Endpoint |
| API type | chat-completions |
| vendor | customendpoint (do not change) |
| URL | https://platform.qubrid.com/v1 |
| Example model ID | MiniMaxAI/MiniMax-M3 |
| API key | Your Qubrid API key |
Model IDs vary by model-always copy the ID from Serverless Models or the Qubrid platform.
Frequently Asked Questions (FAQ)
Go to VS Code Docs
Learn more about managing language models and custom endpoints in VS Code